Installing a dishwasher in your home can be a great convenience, saving you time and effort when it comes to cleaning up after meals. While the process of hooking up a dishwasher can seem daunting at first, with a few simple steps and some basic tools, you can have your new appliance up and running in no time. In this article, we will walk you through the process of hooking up a dishwasher step-by-step, providing tips and guidance along the way.
Before You Begin
Before you begin the installation process, there are a few things you should do to prepare. First, make sure you have all the necessary tools and materials. You will need:
- Screwdrivers (both Phillips and flathead)
- Adjustable wrench
- Pliers
- Teflon tape
- Dishwasher installation kit (usually included with the dishwasher or purchased separately)
- Electrical tape (optional)
- A level (optional)
You should also make sure you have enough space for your new dishwasher. Measure the opening where you plan to install the dishwasher and compare it to the dimensions of the dishwasher you plan to purchase. Make sure you have enough clearance above and around the dishwasher for proper ventilation.

Table of Contents
Step 1: Turn Off the Power and Water
Before you begin installing the dishwasher, you need to turn off the power and water supply to the area where you will be working. Locate the circuit breaker that controls the power to your kitchen and turn it off. Next, locate the shut-off valve for your hot water supply and turn it off. You should also turn off the water supply to your kitchen sink, which is usually located under the sink.
Step 2: Prepare the Space
Once you have turned off the power and water, you can begin preparing the space for the dishwasher. Remove any cabinets or drawers that may be in the way of the dishwasher, and make sure the space is clean and dry. You may also want to use a level to ensure that the space is level, which will help ensure that the dishwasher operates properly.
Step 3: Install the Drain Hose
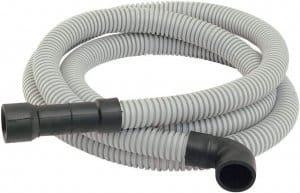
The first step in actually installing the dishwasher is to install the drain hose. This is the hose that will carry wastewater from the dishwasher to your home’s plumbing system. To install the drain hose, first remove the dishwasher’s access panel. This panel is usually located at the bottom of the dishwasher and can be removed by loosening a few screws.
Once you have removed the access panel, you should see the drain pump and the drain hose. The drain hose should be connected to the drain pump with a hose clamp. Remove the hose clamp and slide the drain hose off the drain pump. Next, attach the hose to the dishwasher’s drain outlet, which is usually located at the back of the dishwasher. Use a hose clamp to secure the hose to the outlet.

Finally, connect the drain hose to your home’s plumbing system. The drain hose should be routed through a hole in the cabinet or floor and connected to the plumbing using a high-loop or air gap. A high-loop is a loop in the drain hose that is positioned higher than the sink’s rim. An air gap is a device that is mounted on the sink or countertop and prevents wastewater from flowing back into the dishwasher. The method you use will depend on your local plumbing code, so be sure to check with your local authorities to determine which method is required.
Step 4: Install the Water Supply Line
Next, you need to install the water supply line. This is the line that will bring hot water to the dishwasher. To install the water supply line, first locate the inlet valve on the bottom of the dishwasher. This valve is usually located at the back of the dishwasher and can be accessed by removing the access panel.
Next, attach the water supply line to the inlet valve. Use a wrench to tighten the connection, being careful not to over-tighten and damage the valve or the supply line. Be sure to wrap Teflon tape around the threads of the valve before connecting the supply line to prevent leaks.
Once the water supply line is connected to the inlet valve, you need to connect the other end of the line to your home’s hot water supply. This can usually be done by connecting the line to the hot water shut-off valve located under the sink. Again, use Teflon tape to ensure a tight, leak-free connection.
Step 5: Connect the Electrical Wiring
Now that the water and drain lines are connected, you need to connect the electrical wiring. Start by turning the power back on at the circuit breaker. Next, remove the electrical access panel on the dishwasher and locate the wiring box. The wiring box should be located near the bottom of the dishwasher and will have a cover that can be removed by loosening a few screws.
Inside the wiring box, you should see three wires: a black wire, a white wire, and a green or bare wire. The black wire is the hot wire, the white wire is the neutral wire, and the green or bare wire is the ground wire. Connect the black wire to the black or red wire in the electrical box using a wire nut. Connect the white wire to the white wire in the box, and connect the green or bare wire to the ground screw in the box.
Finally, wrap electrical tape around the wire nuts to secure them in place and prevent them from coming loose over time.
Step 6: Secure the Dishwasher
With the water, drain, and electrical lines connected, you can now secure the dishwasher in place. Most dishwashers come with mounting brackets that can be attached to the sides of the dishwasher and screwed into the surrounding cabinets or countertop. Follow the manufacturer’s instructions to determine where to place the brackets and how to secure them in place.

Once the brackets are in place, carefully slide the dishwasher into position, making sure the water and drain lines do not become kinked or pinched. Use a level to ensure that the dishwasher is level from front to back and side to side. If necessary, adjust the leveling legs on the dishwasher to achieve a level installation.
Step 7: Test the Dishwasher
With the dishwasher installed and secured in place, it’s time to test it out. First, run a cycle without any dishes to make sure there are no leaks or other issues. Check the drain hose and water supply line for leaks, and make sure the dishwasher is draining properly.
If everything looks good, load up the dishwasher and run a cycle with dishes to make sure everything is working properly. Check that the dishes are coming out clean and dry, and that there are no leaks or other issues during the cycle.
How to Hook up Dishwasher?
Hooking up a dishwasher is a fairly simple process. Before you begin, you’ll need to make sure that all the necessary components are in place, including the dishwasher, drain hose, water supply line, and power cord.
First, locate the area where your dishwasher will be installed and connect the drain hose to the sink’s garbage disposal or tailpiece. Next, attach the water supply line to a cold water source such as an existing shut-off valve under the sink. Finally, plug in the power cord and turn on the circuit breaker if needed.
Once everything is connected properly and securely, you can now test run your dishwasher by filling it with dishes and running it through a cycle. If all goes well, you should now have a fully functional dishwasher!
How to Hook up a Dishwasher Drain?
Hooking up a dishwasher drain is a relatively simple process. First, you’ll need to find the right spot for the dishwasher. The location should be near your kitchen sink and close to a water source.
Next, you’ll need to connect the dishwasher drain hose to the garbage disposal or air gap. If your garbage disposal has an outlet for a dishwasher drain hose, simply attach the hose to it. If not, attach the hose to an air gap that is installed on top of your sink. Make sure it’s securely fastened with clamps or zip ties.
Finally, you’ll need to connect the other end of the hose to the dishwasher itself. This can be done by attaching it directly onto the inlet valve located on the back of the dishwasher. Securely tighten any clamps or zip ties around this connection as well. Once all connections are made, turn on both water sources and check for leaks.
Conclusion
Hooking up a dishwasher may seem intimidating at first, but with a few basic tools and some careful attention to detail, it can be a relatively straightforward process. By following the steps outlined in this article, you can have your new dishwasher up and running in no time, saving you time and effort in the kitchen and making your home a more efficient and convenient place to live.

